


Boosting Development Efficiency with CppDepend and Jenkins Integration
This awesome in-depth tutorial is based on the NDepend (The CppDepend like for .Net) integration written by Richard Moss.
- Prerequisites and notes
- Calling CppDepend
- Using absolute or relative paths in a CppDepend project
- Failing the build
- Publishing the HTML
- Viewing the report
- Using external resource files to avoid duplication
Prerequisites and notes
- This guide is written on the assumption you are familiar with Jenkins and configuring freestyle projects,
- In order to publish reports for viewing within Jenkins, you need to have installed the HTML Publisher plugin
- The CppDepend GUI has been used to create a CppDepend project file for later analysis
- An existing freestyle project is available which already successfully checks out and compiles the assemblies the CppDepend project will process
- CppDepend must be installed on any computers used as a Jenkins build agent. I have tested versions 6 and 7 without issue
- The default Jenkins content security policy prevents embedded CppDepend reports from being viewed correctly. This guide contains instructions on reconfiguring the policy
Calling CppDepend
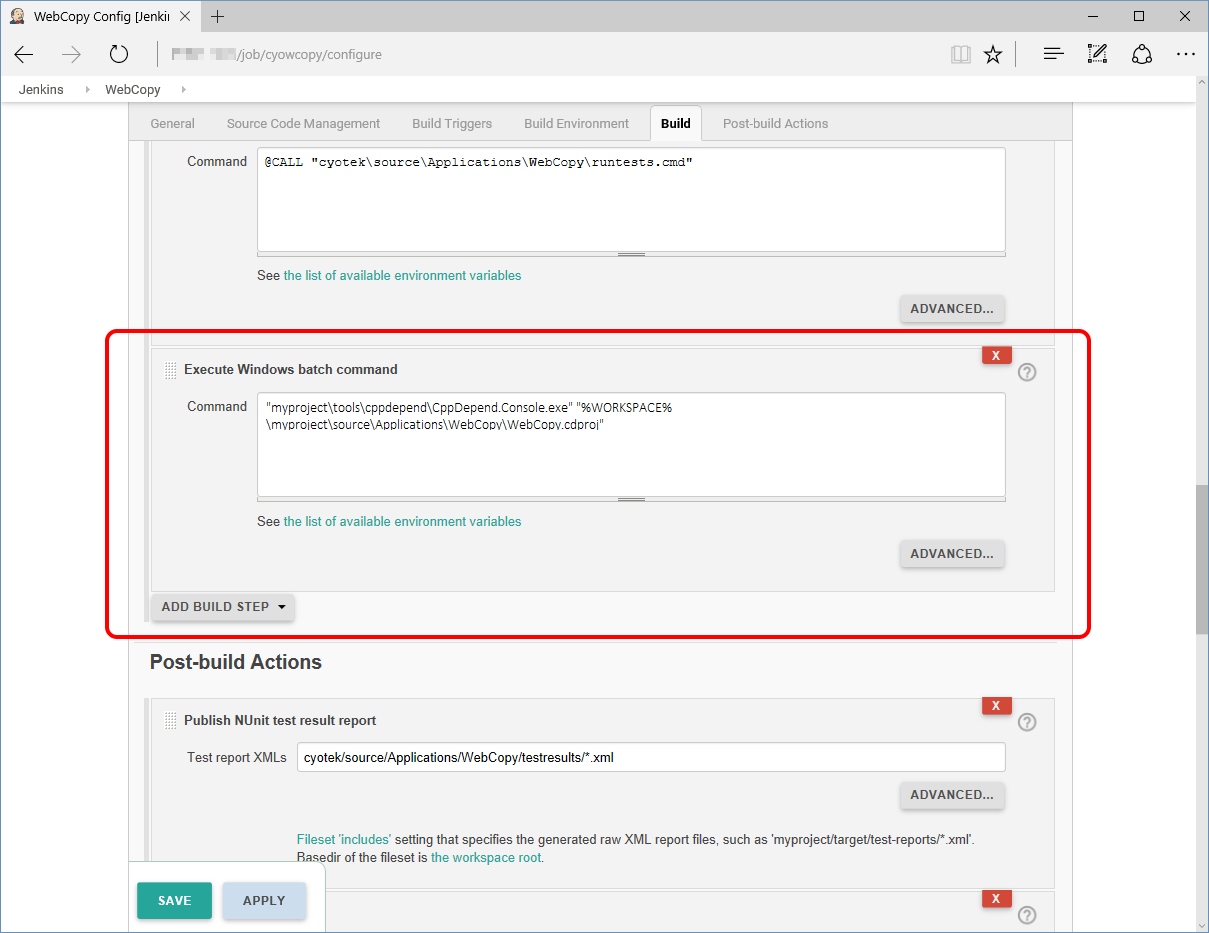
At present, there isn't a dedicated Jenkins plugin available for CppDepend, so we're slightly limited in how much integration we can do.
The first step is to call CppDepend. We can do this by adding a Execute Windows batch command step to our project and then set the Command field to call CppDepend.Console.exe passing in the filename of our project.
CppDepend.Console.exe "%WORKSPACE%\myproject\source\Applications\WebCopy\WebCopy.cdproj"
| CppDepend.Console.exe requires the project filename to be fully qualified. You can use the %WORKSPACE% environment variable to get the fully qualified path of the agent workspace and append your project filename to that |
I have CppDepend and other similar tools used by builds checked into SVN so that they automatically get checked out into a build agents workspace, so in my case I can use a relative path pointing to CppDepend.Console.exe. Alternatively, if the location of CppDepend's binaries are part of the OS path, you can omit the path completely.
Using absolute or relative paths in a CppDepend project
By default, all paths and filenames inside the CppDepend project are absolute. Jenkins builds take place in a temporary workspace, the location of which could be different for each agent. In such scenarios, the use of absolute paths could result in either absolute failure, or out-dated / unexpected results.
There are two ways we can work around this - the first is to use command line switches to override the paths in the project, and the second is to make them relative.
Overriding the absolute paths
The InDirs and OutDir arguments can be used to specify override paths. InDirs controls where all the source files to analyse are located and OutDir specifies where the report will be written. Note that InDirs allows you to specify multiple paths if required.
CppDepend.Console.exe "%WORKSPACE%\myproject\source\Applications\WebCopy\WebCopy.cdproj" /InDirs "%WORKSPACE%\myproject\source\Applications\WebCopy" /OutDir "%WORKSPACE%\myproject\source\Applications\WebCopy\CppDependOut"
Configuring CppDepend to use relative paths
These instructions apply to the stand alone tool, but should also work from the Visual Studio extension.
- Open the CppDepend Project Properties editor
- Select the Paths Referenced tab
- In the path list, select each path you want to make relative
- Right click and select Set as Path Relative (to the CppDepend Project File Location)
- Save your changes
Failing the build
If the Execute Windows batch command returns non-zero, by default Jenkins will fail the build. When CppDepend runs successfully and no Quality Gate is failing then it will return the expected zero. However, even if it has otherwise ran successfully, it will return non-zero in the event of Quality Gate failure.
Depending on your needs, you might want to disable this behaviour. For example, if you are using CppDepend with an existing code base, then potentially you're going to have genuine violations to investigate, or false positives.
We can handle this either by marking the build as unstable or suppressing the error.
Marking the build as unstable
The Execute Windows batch command has an additional parameter (hidden behind the Advanced button) named ERRORLEVEL to set build unstable. By setting the value of this field to 1 (the exit code CppDepend will return when critical violations are encountered), then the build result will be Unstable, but it will continue executing.
Suppressing the error
As the name of the step, Execute Windows batch command, suggests, this isn't the execution of a single command. Jenkins will create a batch file based on the contents of the Command field which it then executes. Therefore, to suppress the error we simply need to exit the batch file ourselves, allowing us to supply our own exit code.
To do this, just add exit /b 0 as a new line in the Command field and any existing error code will be ignored.
| If you do this and CppDepend fails to run for any other reason, you won't know about it unless you check the log files. I'd probably just go with marking the build as unstable, but you could also change the command to start checking ERRORLEVEL values manually and acting accordingly. |
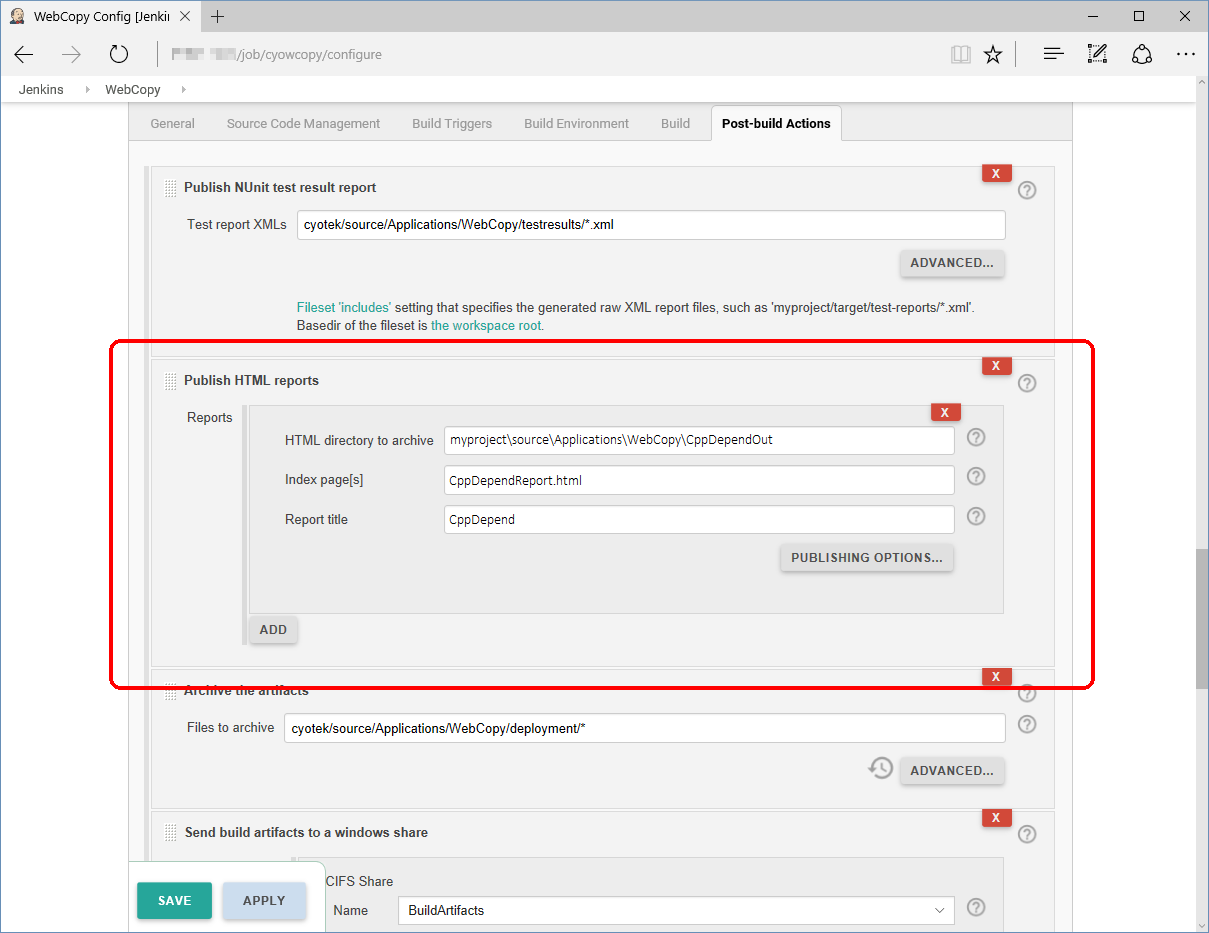
Publishing the HTML
After the CppDepend analysis has completed, a HTML report will be generated. While this report doesn't offer the level of functionality that viewing the results in CppDepend's GUI does, it provides a lot of useful data.
To embed this into Jenkins, we need to add a Publish HTML reports post-build step.
- Set the HTML directory to archive field to point to the location where the CppDepend report has been saved - by default this is a folder named CppDependOut located in the same folder as the CppDepend project.
- Set the Index page[s] field to be the name of the report, which is always CppDependReport.html
- Finally, set the Report title field to be whatever you want - this will be used to label the navigation links in Jenkins
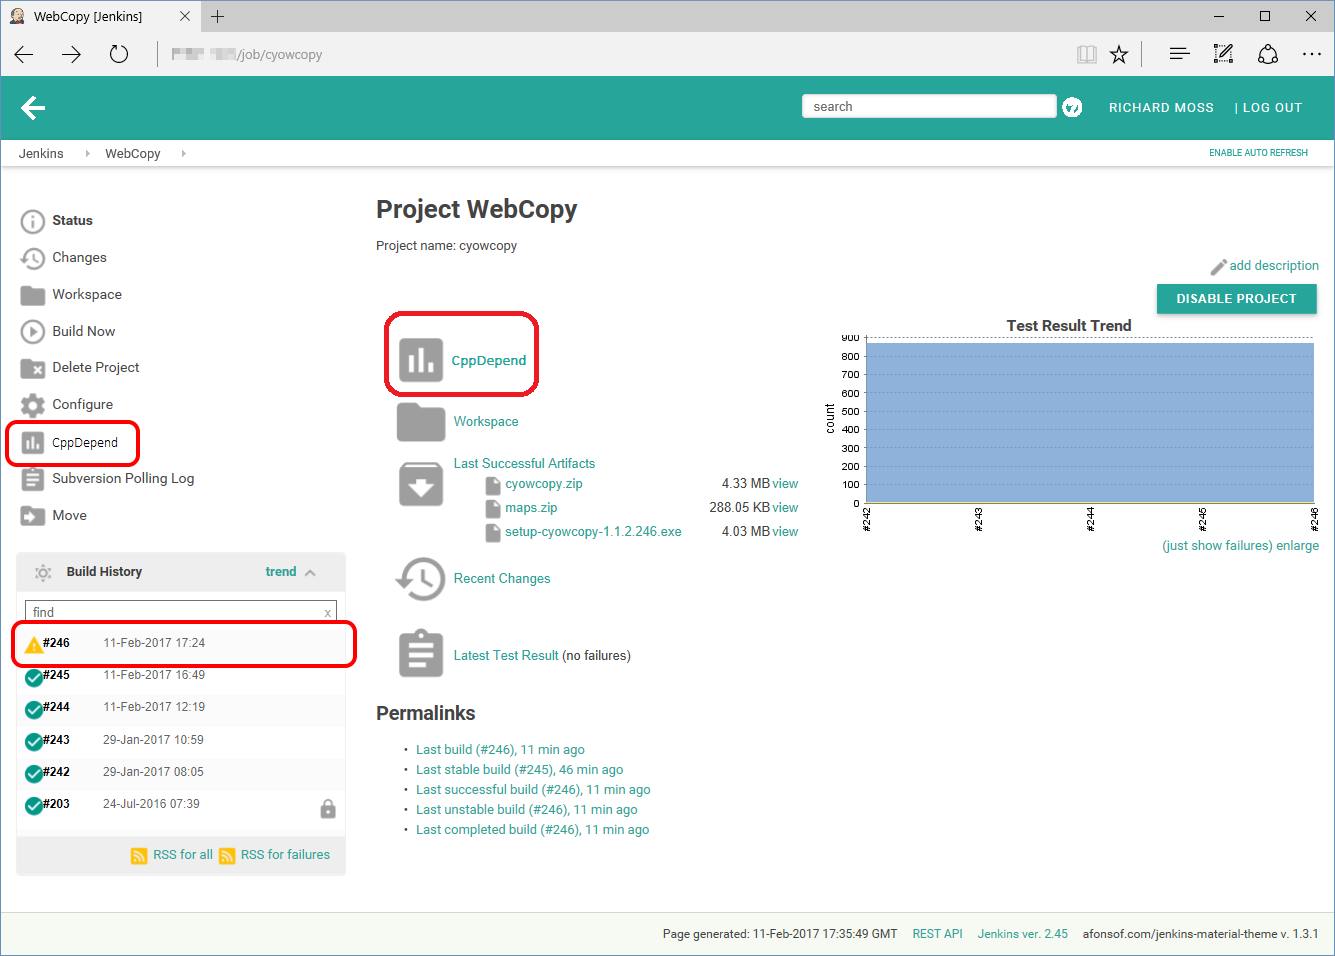
Viewing the report
| As I mentioned at the start of this article, Jenkins has a security policy that restricts embedded resources. This policy cripples the CppDepend report, and so you will need to loosen the restrictions slightly as per my previous post. |
Once your Jenkins job has been ran and completed successfully new navigation options for viewing the reports should appear in the sidebar for the job, and the status overview providing access to the CppDepend report.
Using external resource files to avoid duplication
Another CppDepend default is to save all the rules in the project file. These stock rules substantially increase the size of the CppDepend project and if you don't modify them it doesn't really make sense to have them duplicated over and over again.
Fortunately, CppDepend allows rules to be stored in external files, and so I used the CppDepend GUI to create a rules file. Now each project has had all the built in rules deleted and just references the external file. Handy!
If your projects are using absolute paths, you can just the /RuleFiles and /KeepProjectRuleFiles parameters with CppDepend.Console.exe for overriding the absolute versions if required.
Similarly, CppDepend version 2017 introduces new settings for project debt, but also provides the ability to store these in an external file. Regretfully there doesn't seem to be override switches available in CppDepend.Console.exe, but as I've yet to test the technical debt features yet I don't know if this will be an issue or not. (CppDepend Team Remark: User feedback will be welcome on that)